Key takeaway
Starting a Yocto BitBake build on 6.0 “Wrynose” LTS (supported until 2030) now uses the bitbake-setup tool and configuration fragments rather than the older git clone poky workflow. After installing required host packages and configuring the en_US.UTF-8 locale, initialize the build tree with bitbake-setup init --non-interactive, source init-build-env, enable the default-disabled root login via a fragment, and run bitbake core-image-minimal. Once the build completes, boot the image in QEMU with runqemu qemux86-64 nographic and log in as root.
This post follows the official Yocto Project Quick Build documentation (6.0) and the bitbake-setup output from a real run. Items that were not measured, such as build time, disk usage and boot logs, carry no numbers and are labelled “typical example (not measured).”
What is a Yocto BitBake build, and what host preparations are required?
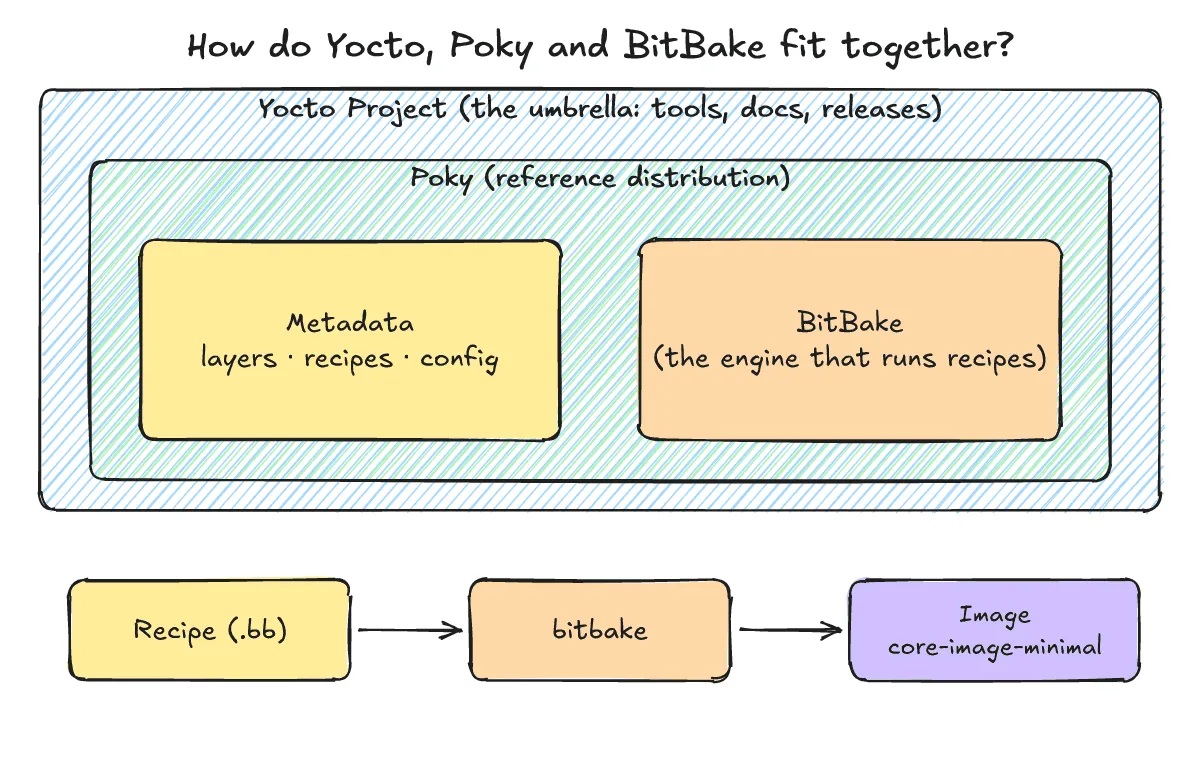
Short answer: Yocto Project is an open-source project for building embedded Linux, Poky is its reference distribution, and BitBake is the engine that reads recipes and runs tasks. To build core-image-minimal and verify it with runqemu under the 6.0 LTS, you need plenty of disk and RAM, the required packages, and the en_US.UTF-8 locale.
- Yocto Project: The umbrella open-source project for building embedded Linux systems.
- Poky: The Yocto Project’s reference distribution.
- BitBake: The engine that parses recipe metadata, resolves task dependencies and runs them.
- Releases: The current LTS is 6.0 “Wrynose”, released in April 2026 and supported until 2030. The previous LTS, 5.0 “Scarthgap”, is supported until April 2028.
Host requirements (6.0 Quick Build docs):
- At least 140 GB of free disk and 32 GB of RAM
- A supported distribution: recent Fedora, openSUSE, CentOS, Debian or Ubuntu
- Tool versions: Git 1.8.3.1+, tar 1.28+, Python 3.9.0+, gcc 10.1+, GNU make 4.0+
For comparison, the previous LTS (5.0 Scarthgap) docs listed 90 GB of disk, 8 GB of RAM and Python 3.8.0+.
On Ubuntu/Debian, install these packages.
sudo apt-get install build-essential chrpath cpio debianutils diffstat file gawk gcc git iputils-ping libacl1 libcrypt-dev locales python3 python3-git python3-jinja2 python3-pexpect python3-pip python3-subunit socat texinfo unzip wget xz-utils zstdYocto builds require the en_US.UTF-8 locale. First check whether it is installed.
locale --all-locales | grep en_US.utf8If nothing is printed, set the locale up.
sudo dpkg-reconfigure locales
# Or append en_US.UTF-8 UTF-8 to /etc/locale.gen and run sudo locale-gen
How do you set up the environment with bitbake-setup and run your first bitbake build?
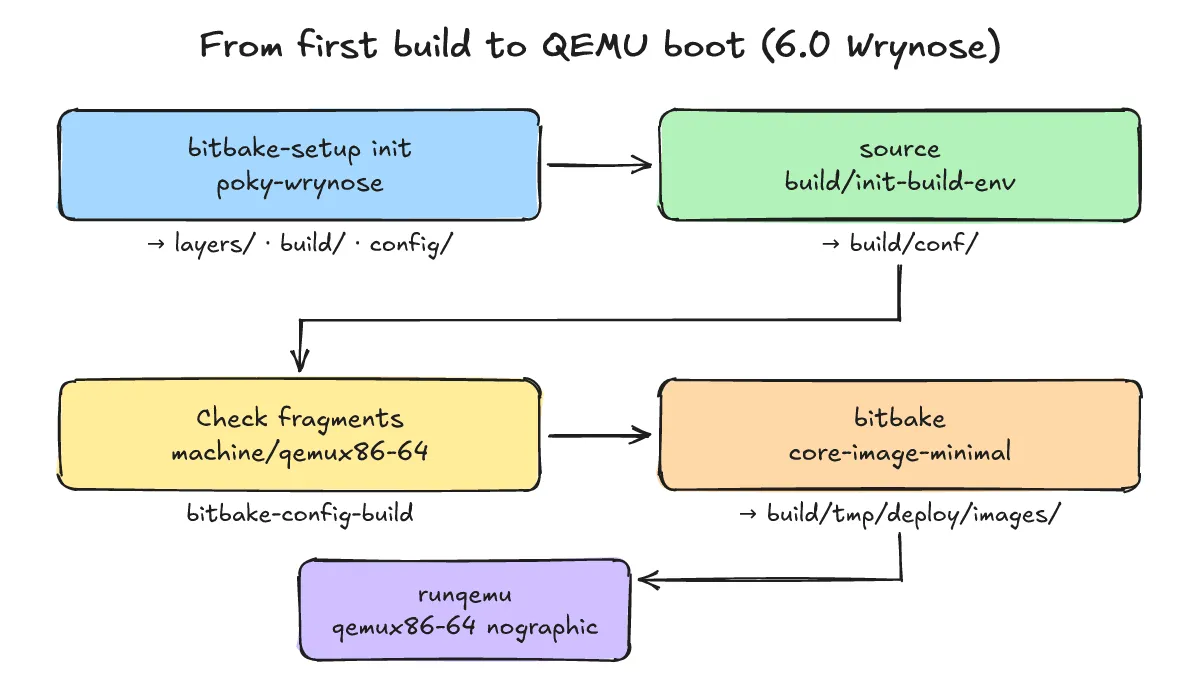
Short answer: Run bitbake-setup init to initialize the LTS branch and target machine, source the generated init-build-env, enable the root login fragment, and run bitbake core-image-minimal.
Two things changed in 6.0. You use bitbake-setup instead of cloning poky yourself, and you choose the machine and distro through configuration fragments instead of editing MACHINE in local.conf. As a result, local.conf stays almost empty.
1) Getting bitbake-setup and initializing
git clone https://git.openembedded.org/bitbake
./bitbake/bin/bitbake-setup init
The non-interactive LTS form is below, copied as the tool itself printed it in a real run.
bitbake-setup init --non-interactive poky-wrynose poky distro/poky machine/qemux86-642) The generated directory layout
build/: The BitBake build directory and a READMElayers/:bitbake,openembedded-core,meta-yocto,yocto-docsconfig/: Configuration fragment metadatabuild/conf/:bblayers.conf,local.conf,site.conf,templateconf.cfg,conf-notes.txt,conf-summary.txt
3) Loading the build environment
source poky-wrynose/build/init-build-envThe script is called init-build-env; it was oe-init-build-env in the old poky tree.
4) Checking fragments and enabling root login
bitbake-config-build list-fragmentsConfirm that distro/poky and machine/qemux86-64 are active. In 6.0 root login is disabled by default, so to log in as root with an empty password in QEMU you must enable this fragment.
bitbake-config-build enable-fragment core/yocto/root-login-with-empty-passwordThere is also an optional speed-up fragment that uses an sstate mirror and hash equivalence. It only helps when downloading is faster than building.
bitbake-config-build enable-fragment core/yocto/sstate-mirror-cdn5) Building the first image
bitbake core-image-minimalThe official docs build core-image-sato, the GUI image. This post builds the smaller standard image core-image-minimal, which is enough for a nographic console.
The first build is slow because, in the docs’ words, “The build process creates an entire Linux distribution, including the toolchain, from source.” Building the toolchain, kernel and root filesystem from source takes far more time and CPU than building a single package. I didn’t measure the exact time or disk usage, so none are given.
If you are on the previous LTS (5.0 Scarthgap), the flow differs:
git clone git://git.yoctoproject.org/poky, thengit checkout -t origin/scarthgap -b my-scarthgap,source oe-init-build-env, and settingMACHINEinlocal.conf.
How do you boot the built image in QEMU?
Short answer: Once the artifacts appear in build/tmp/deploy/images/qemux86-64/, boot headless with runqemu qemux86-64 nographic and log in as root.
This starts QEMU on your terminal console (headless).
runqemu qemux86-64 nographicThe official Quick Build doc uses this example. snapshot means changes to the root filesystem are not kept after QEMU exits.
runqemu snapshotThe kernel image, root filesystem image and other files QEMU boots from live in build/tmp/deploy/images/qemux86-64/. At the login prompt type root; since the root login fragment is enabled, no password is needed.
The following is a typical example (not measured), with no timestamps or sizes.
qemux86-64 login: root
root@qemux86-64:~#
How to exit depends on the mode.
nographicconsole: Runpoweroffin the shell, or pressCtrl-A X(the standard QEMU shortcut)- Graphical mode: Press
Ctrl-Cin the terminal you launched it from
Where do you start troubleshooting if the first build fails?
Short answer: Missing locales, missing host tools and blocked network fetches are the usual suspects, so check the error log and the host environment first.
What if the BitBake server won’t start and the error mentions en_US.UTF-8?
This is the actual output from a machine without that locale (actual output).
ERROR: Unable to start bitbake server (None)
ERROR: Server didn't start, last 60 loglines (.../poky-wrynose/build/bitbake-cookerdaemon.log):
Please make sure locale 'en_US.UTF-8' is available on your system
Fix: Run sudo dpkg-reconfigure locales, or add en_US.UTF-8 UTF-8 to /etc/locale.gen and run sudo locale-gen to generate the locale.
What if source downloads (fetcher) fail or the build stops midway?
Proxies and firewalls often block external git or tarball access. Check your network and proxy settings (http_proxy, https_proxy). Also check free disk space, since falling below the officially recommended 140 GB can stop a build partway.
How do you share caches to speed up rebuilds?
Point DL_DIR (downloaded sources) and SSTATE_DIR (sstate cache) at separate directories shared by several build directories, and repeat builds get faster.
What should you read after the first build?
- bbappend로 레시피 수정하기
- Yocto systemd 서비스 레시피
- IMAGE_INSTALL과 RDEPENDS